Tour of Editing Options
An introduction to the major options for controlling your content.
Logging In
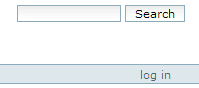
To edit your site, you must first establish your credentials by logging in. Look to the upper-right of your site's home page. Under the search box -- typically in a shaded horizontal bar -- you should see a "log in" link. Follow it to reach the login page, where you may enter your login id and password.
Your site uses session cookies (i.e., cookies that are forgotten when you close your web browser or log out) to remember your identity. You must have session cookies enabled in your browser to edit the site. Most security software has no problems with session cookies. You'll also want to have JavaScript (also known as ECMAScript) enabled. Editing your site is possible, but much more difficult, without JavaScript.

After logging in, take a look at the shaded horizontal bar again. It should now show your login id and a set of personal option links. Personal options include:
- Preferences
- Options to change preference settings including your e-mail address, password and some editing options. The e-mail address you enter via preferences is the one that will be used to send you a new password if you forget your current one.
- Undo
- A list of the most recent changes to your site. It allows you to undo actions by checking the accompanying box and pushing the "undo" button. The undo mechanism is generally a reliable way to recover from your most recent action, but not to be relied on for anything more complex.
Expect your site's web pages to load and display more slowly when you're logged in. The editing functions require lots of extra support in the form of extra stylesheets, JavaScript and security checks. This won't affect users that aren't logged in.
Content Options

Take a look at the central content area of a web page in your site. When you're logged in, you should see a green box surrounding the content area. At the top of this box are tabs and drop-down that give you editing options. The tabs generally change your view of the content; the option drop-down menus allow you to make quick state changes. Both tab and option displays change depending on the type of content with which you're working.
Tabs
- Contents
-
The "Contents" tab is available if content object at which you're looking is "folderish." A folder may contain other items, like pages, images, downloadable files and other folders. Choose the contents view by clicking the tab.
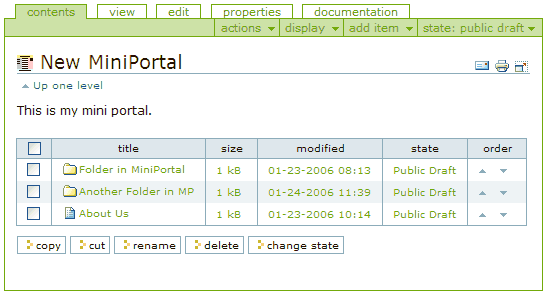
The contents view gives you a listing of the contents of the current folder. From this view, you may navigate to content items by clicking on their titles. Copy, cut, rename or delete an item by checking its box and pressing the appropriate buttong. Once you've cut or copied an item, a "paste" button will appear. Re-order items in the folder by using the light blue up and down arrows to the right of each item's listing.
- View
- Choosing the "View" tab should display something very close to what the public will see when they look at the page. The public won't see the green content box.
- Edit
- Use the "Edit" tab to change the item's title, description and other main content. Editing particular types of content varies dramatically, and is covered in other documents.
- Properties
-
The "properties" tab is used to display and edit an item's metadata. For the most part, you may ignore the properties tab. Let us point out a couple of the most interesting options, though. Don't forget to press the form's "save" button if you make changes.
 Exclude From Navigation
- The properties tab form often includes an "Exclude From Navigation" option that may be used to prevent the current item from showing up in public listings (such as the left navigation portlet or a folder listing) of folder contents.
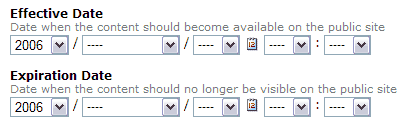 Effective and Expiration Dates
- You may set effective (the first date/time the item will be available) and expiration (the last date/time available) dates for most items. These govern when the item will be publicly available. Logged in editors will always be able to get at items.
- Others
- Several other tabs may appear for special items. The home of your site, for example, should have a "Documentation" tab that includes a link to this tutorial.
Drop-Down Options
The top, shaded area of the green content box will have several drop-down menu option links. Each of these has a little, downward-pointing triangle to indicate that it's a drop-down menu..
The drop-down menus are an advanced JavaScript function, and have been known to mis-behave in some older browsers. If they work poorly for you, you may wish to try a recent version of Firefox, which is generally the most standards-compliant browser available (at the time of this writing).
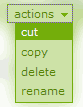 Actions
- The "actions" drop-down menu allows you to cut, copy, delete or rename the current item (the one you're viewing). If you've already cut or copied, there's also an option to paste whatever's been most recently cut or copied into the current folder.
 Display
-
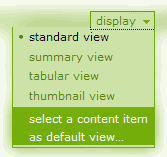
The "display" options drop-down allows you to change the way the current item is displayed. Display options vary with each type of content item. The most useful display options are associated with folders. Folder display options allow you to choose from standard (a listing), summary, tabular or thumbnail views of the folder contents. A "thumbnail" view of a folder containing images is a quick way to get a photo gallery.
Folders also have an option to choose one of the contained items as the "default" view of the folder. A "default" view is what will be shown when the folder is viewed. This is most commonly used to display a document instead of a contents listing when a browser navigates to the folder.
 Add to Folder
-
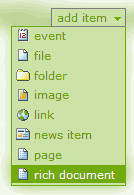
Use the "Add to Folder" drop-down menu to choose a content type for an item to add to the current folder. When you choose a content type, you'll be taken to a form that allows you to create an item of the chosen type. Content types include:
- Event
- A calendar event. All the events for a site are pulled together to display the "Events" tab and "Upcoming Events" portlet. Please note: the event content type is not particularly useful if you're using the Community Calendar for your event calendar.
- File
- A downloadable file. Most commonly used to make PDFs, office automation (spreadsheets, presentations) or rich media files available for download.
- Folder
- A folder to contain, and organize, other objects.
- Image
- A web graphic file. Most common formats are GIF, JPG (photos) and PNG. Please note: please size your images appropriately and compress them aggressively. Save bandwidth and storage!
- Link
- A link to another web resource.
- News Item
- News items are aggregated from wherever you create them into the News tab and portlet.
- Page
- A web page! These may include rich formatting and images.
- State
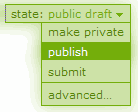 The "state" pull-down menu allows you to change the publication status of a content item. This determines its availability to different visitors. There are three common publication states:
- Published
- Published items are visible to everyone, and are included in the news and events (in the case of news and event items) aggregations.
- Public Draft
- Public draft items are visible to everyone, but are not -- in the case of news and event items -- included in the news and events aggregations.
- Private
- Private items are hidden from the general public. They are still visible to you -- when logged in -- and to system administrators. Please note: a public web site like this isn't a good place to store confidential information. Think of these as publicity options.
