Using the Visual Editor
How to use the Kupu rich text editor to edit and style text. [Note: Some of the icon graphics may change over time. Hover over an icon to read its description.]
Most content types (page, news, event) that have text components will allow you to use the visual editor to enter, edit and style the text. Your ability to use this option largely depends on the web browser you're using to edit your site. Several new-generation browsers have HTML-edit controls and newer version of JavaScript available. Mozilla's Firefox (recommended) and Microsoft's Internet Explorer version 6.x support this function; Apple's Safari is due to add it in an upcoming release.
If your browser has the ability, you'll see the toolbar below at the top of major text entry fields. If your browser isn't compatible, or if you've turned off JavaScript, you'll need to use HTML, StructuredText or ReStructuredText to style your documents.

The visual editor is built on the open-source Kupu editor. This document will introduce you to its use.
Note that although a visual editor field behaves somewhat like a conventional word processor, there are differences. In particular, this editor does not give you the fine control that you may be used to with a conventional word processor. Instead, it's meant to help you work with the site's style sheet to create pages that have similar appearance throughout your site. Some folks fight this, trying to achieve fine control of every bit of text. Try to let go and work with the underlying style sheets; you'll be much happier.
Entering Text
Entering and editing text is much like using a conventional word processor. Put the cursor at the desired location in the field, click your mouse, and you should be able to type text. Press your "Enter" (or "Return") key to end a paragraph. Use Shift-Enter to break a line without starting a new paragraph.
Undo, Redo
 Use the Undo (Alt-z) and Redo (Alt-y) to undo and redo recent changes to the text. Note that this will only affect changes in the visual edit field.
Zooming the Editor
 With left and right column portals and various other bits of visual decoration, the edit field may be cramped. Use the zoom button to expand it to fill the window. Press the button again to return the display to normal.
Pasting Styled Text
You may author your text in a conventional word processor, then copy and paste it into the visual editor. The text will usually retain some of the styling applied in your word processor. The underlying HTML code used by the visual editor is actually that supplied by the word processor from which you copied the text. Some word processors do this relatively well, others poorly. The HTML generated by Microsoft Word (as of this writing) is often appallingly bad, and it can be a lot of work to clean it up.
You'll have the best luck pasting styled text if you do minimal styling in your word processor. You may wish to write, edit and spell-check the text in your word processor, restricting yourself to using simple paragraph styles plus bold and italic. Avoid tables, indents, outdents and margin changes. Then, apply the rest of the styling in the visual editor.
Changing Paragraph Styles
 You may change the basic style of entire paragraphs by selecting a paragraph and choosing a major style from the drop-down style menu in the toolbar. Note that the "Formatted" choice is the same as the HTML PRE (for pre-formatted) tag. Text will be displayed in a monospaced font (like a typewriter) with line endings preserved (don't let lines get long). It's good for poetry, code fragments and simple tables.
Bold, Italics, Super- and Sub- Scripts
 Apply simple character styles by selecting the target text and pressing the bold, italic, super- or sub- script buttons. Please note that italics can be very hard to read on older or lower-resolution displays; for legibility's sake, keep its use to a minimum.
Left-, Center- and Right- Alignment
 Set text to be left-flush, centered or right-flush via the alignment buttons.
Lists
 Create bulleted or numbered lists via the matching buttons. The third button is for definition lists. Definition lists look like this:
- Term One
- Definition of term one.
- Term Two
- Definition of term two.
Enter them by setting your insertion point, pressing the definition list button and typing the term. Then, press Shift-Enter and type the definition. Press Enter to move on to the next term.
Clear list formatting by selecting the list text and pressing the out-dent (remove indent) button.
Indenting Text
 Indent paragraphs with the indent button(paragraph arrow pointing right). Remove the indent with the outdent button (paragraph arrow pointing left).
Adding Images
 What's a web page without images? You may add images in web graphic formats to your page via the image button.
Preparation
You add an image to a web page with an image file in one of several standard formats: GIF (line art), JPG (photographic) or PNG (versatile, usually used for line art). You'll need to use an image editor to prepare these files prior to trying to place them on a web page. Size and compress your images appropriately; keep them small in dimensions and file size or you'll have unhappy viewers.
Using the Image Button
Position the text caret (the point of action marker) at the point at which you want to insert your image; press the image button. You'll see a dialog like the one below:

Use the folder names in the left pane to pick the folder in which you want to store your image or find an already uploaded image. Typically, that will be the "Current folder." When you choose a folder, the center pane will display the folder's existing image contents (if any) along with an Upload ... choice.

To upload a new image that's currently on your computer, click on Upload .... The right pane of the dialog will change to allow you to browse your computer for the image file you wish to upload.
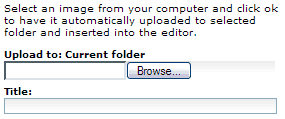
Use the "Title" field to set the title for the uploaded image content item.
The visual editor's image upload feature works with different quirks in different browsers. If it doesn't work for you, try uploading the image separately, then place it via the visual editor.
To place an already uploaded image, click on one of the existing image files displayed in the middle pane. The third pane will then give you options to set the "Alt" text (used when the image can't be displayed or read) and to place the image "left," "inline" or "right." Choose "left" or "right" to float the image to the left or right of the text. Use inline to have it placed in the text as if it was a character.
Hyperlinking Text
 There are different buttons for creating internal links (links within your site; the chain icon) and external (links outside your site; the world icon). In both cases, it's easiest to link text by first writing it, then selecting it and pressing the appropriate link button.
The internal link button will pop up a dialog that allows you to browse through your site to find the link target.
The external link button allows you to input a Uniform Resource Locator (URL). Make sure it's complete, and includes the "http://" or other protocol component.
Tables
 You may use tables to structure your text into rows and columns. Position the text caret and press the Table button to create a table. The visual editor will pop up a dialog to ask the number of rows and columns with which you wish to start.
When you're editing the table, you will usually be able to move between cells, and to open new rows with the tab key. Try using your mouse's context-menu command (usually right click) to get a menu of table options.
Editing Source
 The "Edit HTML Code" button allows you to edit the raw HTML code of the document. Press the button and the visual editor will switch into HTML mode. All buttons except the HTML button will disappear. Press that button again to return to visual editing.
When you return to visual editing mode or save the content item, the HTML changes you've made are passed through a filter that will try to make sure that the HTML is valid. Much of this is under the control of your browser, and it may generate code that doesn't quite do what you intend. The process will also strip away otherwise valid HTML that might endanger the template layout of the overall document.
About Kupu

From the Kupu web site:
"Kupu is Maori and means word, statement, remark. Kupu kupu is Indonesian and means butterfly. Hence, the blue butterfly is Kupu's mascot."
